Stable Diffusion AI is turning out to be quite a versatile utility for image generation and image manipulation. In this article, I will use stable Diffusion inpainting to change the clothes of a person in an image.
Yes, I am talking about building an AI outfit changer for photos using Python!
If you can recall, inpainting involves selecting a region in the input image that you want to replace or change using the Stable Diffusion model.
However, manually selecting the inpainting region can be a tough task and time-consuming as well. To solve this problem I will also use the Slim Segment Anything Model (SlimSAM) to automatically select the inpainting region in the picture.
Install and import Python libraries
This task requires diffusers library to implement inpainting using Stable Diffusion. Apart from that libraries like torch, torchvision, transformers, and matplotlib are also required, and in Google Colab notebooks these libraries are pre-installed.
Let’s enable the GPU and then install the Diffusers and Accelerate libraries. Accelerate library helps in optimizing the performance of Stable Diffusion models.
!pip install diffusers
!pip install accelerate
import torch
from torchvision import transforms
from transformers import SamModel, SamProcessor
from diffusers import AutoPipelineForInpainting
from diffusers.utils import load_image, make_image_grid
import matplotlib.pyplot as plt
Load input image
You can use an image from any stock image website or take any AI-generated image. Make sure there is a single person visible in the picture.
# load image
img = load_image("white_tshirt.jpg")

# display image
img

In this picture, you can see that a person is wearing a white t-shirt and a pair of dark colored pants.
Autoselect clothes in image with SlimSAM model
The main feature of the SlimSAM model is that you can simply select an object in the image and that object will be segmented (masked) by the model.
To select an object, you need to find a point around the center of the object and pass the coordinates of that point to the SlimSAM model. SlimSAM will create a mask image for that object wherein the pixels of that object will be True and the rest of the pixels in the image will be False.
So, I will import the SlimSAM model to get started. Make sure you are connected to the internet, the model will get downloaded from Hugging Face after running the code below.
model = SamModel.from_pretrained("Zigeng/SlimSAM-uniform-50").to("cuda")
processor = SamProcessor.from_pretrained("Zigeng/SlimSAM-uniform-50")
Create mask image for t-shirt
Dimensions of the input image are 640 x 959. Let’s try to change the t-shirt of this person in the image. Approximately (320, 600) is the center point of the t-shirt.
Now I will use these coordinates with the SlimSAM model and predict the mask for the t-shirt.
input_points = [[[320, 600]]] # input point for object selection

inputs = processor(img, input_points=input_points, return_tensors="pt").to("cuda")
outputs = model(**inputs)
masks = processor.image_processor.post_process_masks(outputs.pred_masks.cpu(), inputs["original_sizes"].cpu(), inputs["reshaped_input_sizes"].cpu())
There are multiple masks generated for the input coordinates (320, 600). You can find the number of masks by using the below code.
# get number of mask images
len(masks[0][0])
Output – 3
I will use matplotlib to display all these masks.
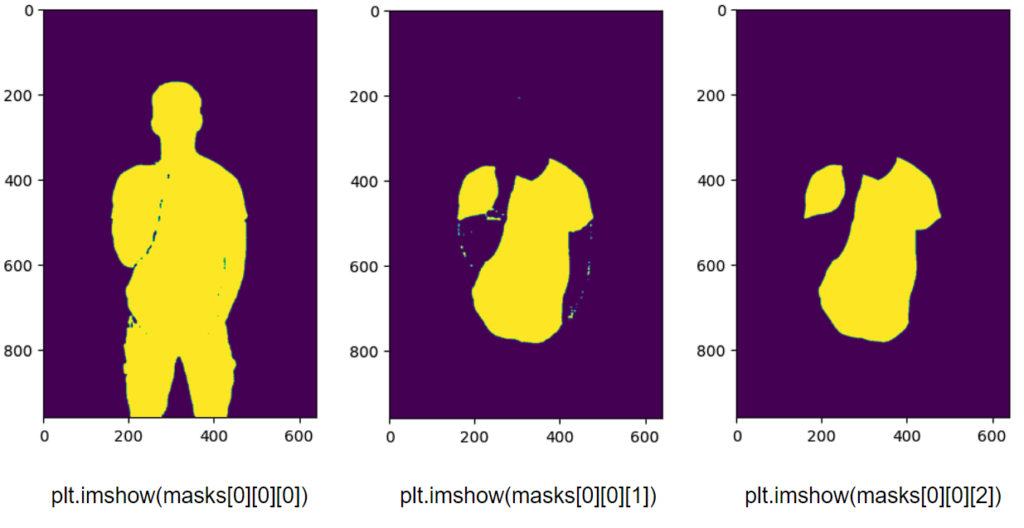
As you can see, the third mask image, i.e., masks[0][0][2], is the most appropriate mask for the t-shirt. I will change this t-shirt with the Stable Diffusion model later.
Create mask image for pants
Now I will generate the mask for the pants worn by the person in the photo using a similar approach.
input_points_2 = [[[200, 850]]]
inputs_2 = processor(img, input_points=input_points_2, return_tensors="pt").to("cuda")
outputs_2 = model(**inputs_2)
masks_2 = processor.image_processor.post_process_masks(outputs_2.pred_masks.cpu(), inputs["original_sizes"].cpu(), inputs["reshaped_input_sizes"].cpu())
Even in this case, three masks were generated by the SlimSAM model. You can use matplotlib (plt.imshow(masks_2[0][0][i]) to display these masks.
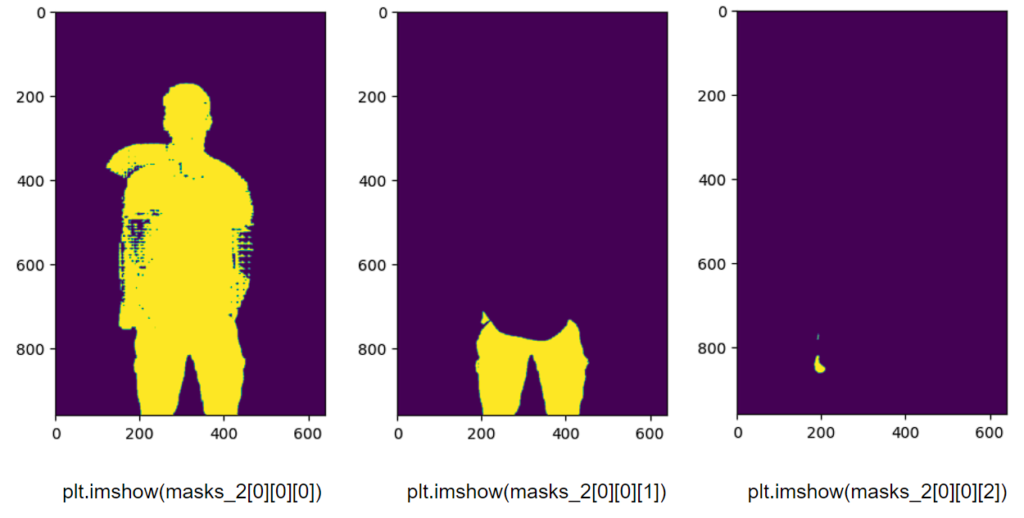
As you can see, the second mask image, i.e., masks_2[0][0][1], is the most appropriate mask for the pants.
Convert mask images into PIL image format
The mask images I have created above are PyTorch tensors with boolean values, i.e., wherever there are yellow pixels the tensor value is True otherwise False.
So, to use these mask images in inpainting, I will convert them from boolean tensors to PIl images.
# Create a ToPILImage transform
to_pil = transforms.ToPILImage()

# Convert boolean tensors to binary tensors
binary_matrix_1 = masks[0][0][2].to(dtype=torch.uint8)
binary_matrix_2 = masks_2[0][0][1].to(dtype=torch.uint8)

# apply the transform to the tensors
mask_1 = to_pil(binary_matrix_1*255)
mask_2 = to_pil(binary_matrix_2*255)

# display original image with masks
make_image_grid([img, mask_1, mask_2], cols = 3, rows = 1)
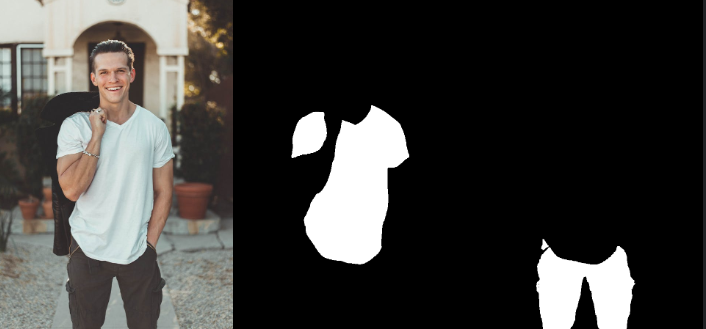
Awesome! Now these masks can be used to inpaint and change the garments in the image.
Edit clothes in picture with Stable diffusion inpainting
Only those parts of the input image will be affected by the Stable Diffusion model corresponding to the white regions in the mask images. The rest of the image will remain unchanged.
Import Stable Diffusion model
I will the ReV_Animated_Inpainting model to change the dress of the guy in the picture.
# create inpainting pipeline
pipeline = AutoPipelineForInpainting.from_pretrained(
    "redstonehero/ReV_Animated_Inpainting",
    torch_dtype=torch.float16
)

pipeline.enable_model_cpu_offload()
Generate a new T-shirt
I will use the input image and the mask image for the t-shirt in the Stable Diffusion pipeline. I will also use a prompt that will guide the model in generating a new t-shirt in the image.
prompt = "flower-print, t-shirt"

# generate image
image = pipeline(prompt=prompt,
                 width=512,
                 height=768,
                 num_inference_steps=24,
                 image=img,
                 mask_image=mask_1,
                 guidance_scale=3,
                 strength=1.0).images[0]

# display input image and generated image
make_image_grid([img.resize([512,768]), image], rows = 1, cols = 2)
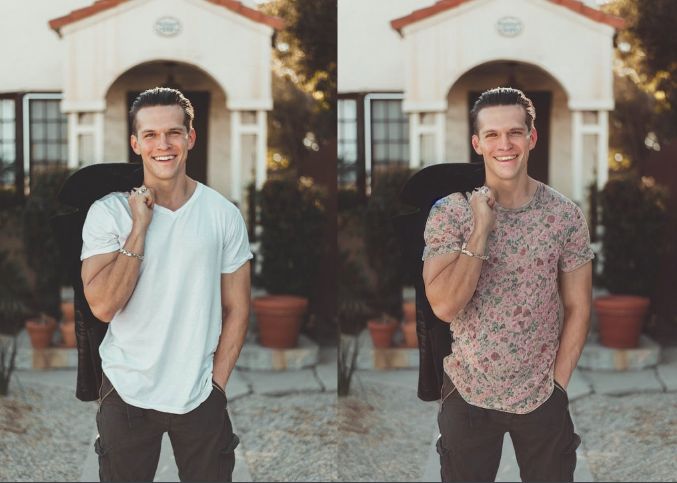
Looks real isn’t it? Feel free to try out different prompts and also play around with the parameters in the Stable Diffusion pipeline to get a variety of outputs.
Generate new pants
Now I will use the same input image but the mask image of the pants of the person.
prompt = "tactical pants"

image = pipeline(prompt=prompt,
                 width=512,
                 height=768,
                 num_inference_steps=30,
                 image=img,
                 mask_image=mask_2,
                 guidance_scale=2.5,
                 strength=1.0).images[0]

make_image_grid([img.resize([512,768]), image], rows = 1, cols = 2)
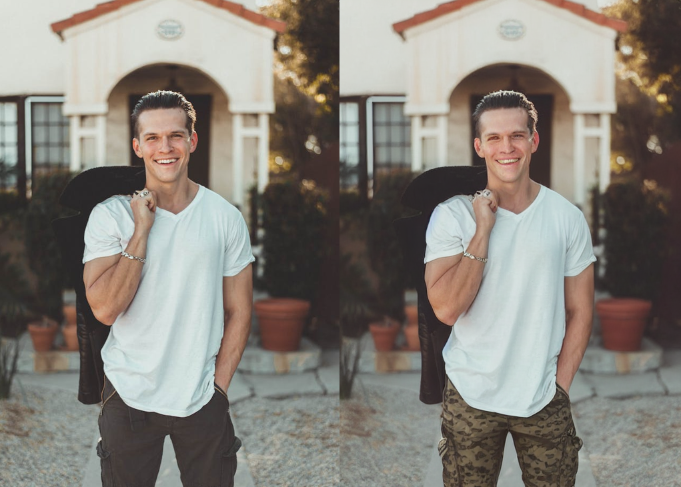
As you can see, a new pair of pants has been generated by the inpainting pipeline.
Conclusion
Hence, the Segment Anything Model (SAM or SlimSAM) with Stable Diffusion can help us replace outfits of people in images with pixel-level accuracy. The regions outside the mask are perfectly unaffected as well.
We can also use an IP-Adapter model here to use an existing dress and guide the model to generate a similar dress. There is a wide range of things that we can do if we combine different AI models, like how combining SlimSAM and Stable Diffusion helped in generating new clothes in the images.