What is IP-Adapter?
In recent years, generative AI has seen remarkable advancements, particularly in the domain of large text-to-image diffusion models. These models have astounded us with their ability to craft incredibly lifelike images.
However, the process of coaxing these models to generate precisely what we desire from mere text prompts can be a daunting task, often requiring intricate and meticulous prompt engineering.
Fortunately, there’s an innovative solution that offers a fresh perspective – the use of image prompts. Instead of relying solely on text, this approach harnesses the power of visual cues.
Traditionally, one common strategy has been to fine-tune pretrained models on specific styles or objects to enhance their generative abilities. But, this method often demands substantial computing resources, placing it out of reach for many users.

This is where IP-Adapter steps into the spotlight. It emerges as a game-changing solution, an efficient and lightweight adapter that empowers pretrained text-to-image diffusion models with the remarkable capability to understand and respond to image prompts.
In essence, it bridges the gap between textual instructions and vivid visual output, making the creative potential of these models more accessible to a broader audience.
Can we use IP-Adapter with Diffusers for image generation?
Yes, we can easily use IP-Adapter with the Diffusers library to generate images. If you want to learn more about Diffusers then I recommend you check out the following articles:
- Merge a Logo with an Image using ControlNet
- A Guide to Stable Diffusion Inpainting for Seamless Photo Enhancements
We will use IP-Adapter and Diffusers in Google Colab to generate images of a person in a specified pose. Make sure you have GPU enabled in your Colab notebook.
How to install IP-Adapters in Colab?
First, connect the Colab notebook to a GPU runtime environment. Then in the first cell of the notebook, run the following commands to clone the GitHub repository – github.com/tencent-ailab/IP-Adapter and install a few models.
# install Diffusers and Transformers libraries
!pip install diffusers["torch"] transformers
System setup to generate images with IP-Adapter and Stable Diffusion
Let’s begin with importing the required modules for this tutorial.
!pip install accelerate
!pip install diffusers
import torch
from diffusers import StableDiffusionControlNetPipeline, ControlNetModel
from diffusers.utils import load_image, make_image_grid
Import ControlNet and Stable Diffusion Models
Let’s load a ControlNet model for human pose and the Rev-Animated diffusion model for image generation.
# load controlnet model
controlnet_model_path = "lllyasviel/control_v11p_sd15_openpose"

controlnet = ControlNetModel.from_pretrained(controlnet_model_path,
                                             torch_dtype=torch.float16)

# define SD pipeline
pipe = StableDiffusionControlNetPipeline.from_pretrained("stablediffusionapi/rev-animated",
                                                         controlnet=controlnet,
                                                         torch_dtype=torch.float16).to("cuda")
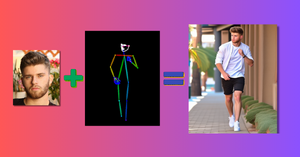
Load input images
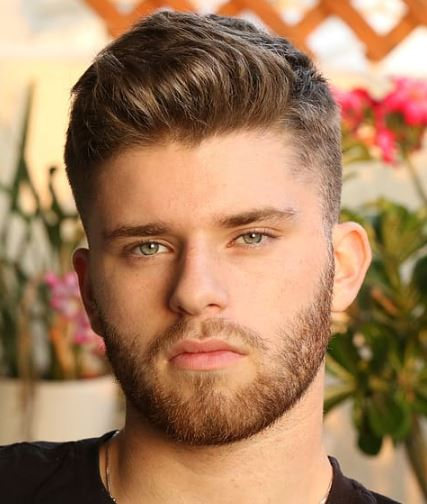
Load an image with the face of a person. This image will be used as an image-prompt by the IP-Adapter model to generate images from the Rev-Animated diffusion model.
ip_adapter_image = Image.open("man.JPG")

#display image
ip_adapter_image
We will also use a human pose image with the above portrait to generate the final image. Let’s load the human pose image.
image = Image.open("human_pose.png")

#display image
image

The image contains several keypoints indicating important joints in the human body. It also has colored edges connecting the keypoints with each other. In addition to the body pose, this image also has facial keypoints marked.
These body and facial keypoints will help the ControlNet model generate images in similar pose and facial attributes.
Attach IP-Adpater model to diffusion model pipeline
It is very easy to use IP-Adapters in Diffusers now. We can quickly add any IP-Adapter model to our diffusion model pipeline as shown below.
pipe.load_ip_adapter("h94/IP-Adapter",
                     subfolder="models",
                     weight_name="ip-adapter_sd15.bin")
Generate Images using Stable Diffusion with IP-Adapter
We will first load the IP-Adapter model and generate a few images without any text prompt.
# generate random seed number for reproducibility
generator = torch.Generator(device="cuda").manual_seed(356)

# generate images
images = pipe(prompt = "",
             generator = generator,
             controlnet_conditioning_scale = 0.8,
             image = image,
             ip_adapter_image = ip_adapter_image,
             num_inference_steps = 50,
             num_images_per_prompt = 2).images

# display images
make_image_grid(images, rows=1, cols=2)
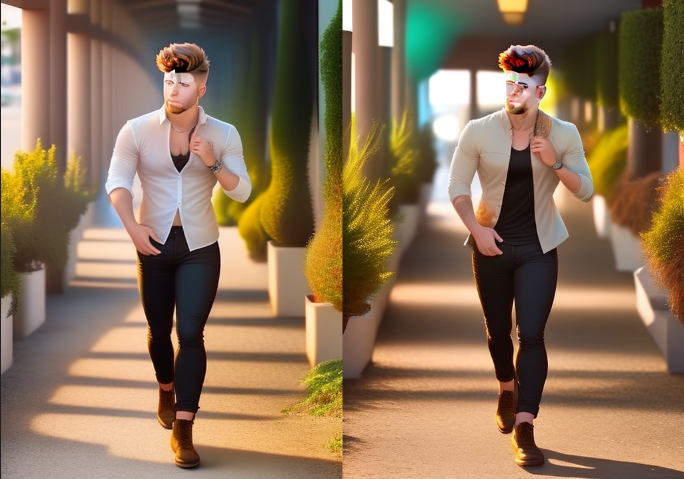
Quite impressive! The face of the subject in the images seems distorted, still the hairstyle looks a bit similar. Rest of the parts of the images are looking good.
Now let’s generate images by adding a text prompt – “young man, ((walking in street)), sneakers, jeans, white shirt, natural light”
images = pipe(prompt = "((walking in street)), sneakers, jeans, white shirt, natural light",
             generator = generator,
             controlnet_conditioning_scale = 0.8,
             image = image,
             ip_adapter_image = ip_adapter_image,
             guidance_scale=5,
             num_inference_steps = 50,
             num_images_per_prompt = 2).images

make_image_grid(images, rows=1, cols=2)
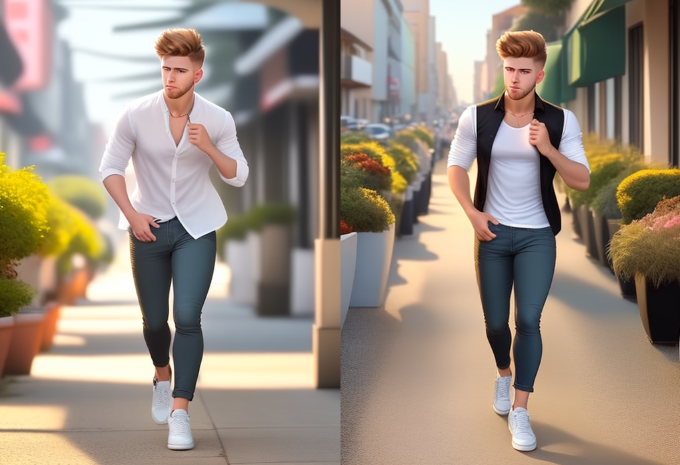
Awesome! As you can see, we are able to generate more controlled images this time with the addition of a text prompt. So, feel free to include a text prompt along with the input image to add more details to your AI-generated images. You can also try out other IP-Adapter models and mix them with several stable diffusion models.