Introduction
Have you ever looked at a picture and wished you could turn it into fun, retro-style pixel art? Well, now you can, thanks to Generative AI it is very much possible. Imagine taking your favorite photos and transforming them into charming pixel artworks that look like they’ve jumped straight out of a video game from the past!
In this article, I am going to show you how to do just that. I will walk you through a simple process where you can take any image you like – a photo of your pet, a beautiful sunset, or even a selfie – and convert it into pixel art in Python. And the best part? You don’t need to be a tech wizard or an artist to do it.
We’re going to use a Stable Diffusion model to turn any image into pixel art without you having to learn complicated software or draw anything by hand. However, basic knowledge of Python and experience with Jupyter Notebook are needed.
How to use stable diffusion for converting images to pixel art?
I will use an Image-to-Image pipeline of the Diffusers Python library with a base Diffusion model and a LoRA model to implement image-to-pixel art generation.
- Base model – SDXL 1.0
- LoRA model – PixelArt.Redmond
I will try to convert the following images into pixel art.


Why should we use the image-to-image pipeline?
In the traditional text-to-image pipeline of the Diffusers library, the main input to the Stable Diffusion model is the text prompt that describes the image and the model generates images accordingly.
So, if we have to create pixel art of an image, we will have to explain the image in detail in the prompt to generate the desired pixel art. However, it is a tedious process and even if you come up with a detailed prompt there is no guarantee that the generated image will turn out to be great.
This is why I will use the image-to-image pipeline because, in addition to the text prompt, it also needs an image as input. The Stable Diffusion model will use the input image as a starting point for the diffusion process and use the text prompt for image generation.
Feel free to learn more about these pipelines from Diffusers documentation.
So, this approach is suitable for converting an image to any style of your choice. For my use case it can generate desired pixel art images even with simple prompts and the output image would resemble the input image.
Why should we use LoRA models?
Diffusion models like SDXL 1.0 or SD v1.5 are quite capable generative AI models for images. They can generate images in any style such as realistic, cyberpunk, cinematic, 3D rendered, LEGO style, and many more.
The quality of the output image depends a lot on the prompt passed by the user. So, even if I use the image-to-image pipeline, I will still have to pass a well-crafted prompt to generate the image in pixel art style.
However, if I use a LoRA model that provides pixel art style to the base model then I do not have to provide any prompt at all. This is one benefit of using LoRA models. If you want to convert an image to a cyberpunk style, then use a LoRA model that is good in cyberpunk style.
PixelArt.Redmond LoRA can help the base model generate awesome and beautiful pixel art based on the input image passed by the user.
The trigger tag for the LoRA model is “Pixel Art”. That means if this trigger tag is included in the prompt then only the LoRA model would be used for image generation along with the base model, or else only the base model would generate the images.
Pixel art generation using Python
I will use a Colab notebook to run the Python code. Make sure the GPU is enabled.
Install packages
!pip install diffusers
!pip install accelerate
!pip install peft
Apart from these libraries, PyTorch will also be used in this notebook, but that comes pre-installed in Colab.
Import Stable Diffusion model
import torch
from diffusers import StableDiffusionXLImg2ImgPipeline
from diffusers.utils import load_image, make_image_grid
As you can see I am importing StableDiffusionXLImg2ImgPipeline hence I can use SDXL 1.0 or any other fine-tuned variant of the same model. However, I’ll use the SDXL Turbo model which generates comparable quality images and uses fewer inference steps.
# import and download SDXL Turbo model
pipe = StableDiffusionXLImg2ImgPipeline.from_pretrained("stabilityai/sdxl-turbo",
                                                        torch_dtype=torch.float16)

# transfer pipeline to GPU
pipe = pipe.to("cuda")
Attach LoRA model to Image-to-Image pipeline
As discussed before, to enable pixel art style in the generated images I will use a LoRA model (PixelArt.Redmond) along with the base model (SDXL Turbo).
The Diffusers library makes it quite easy to add a LoRA model to the diffusion pipeline.
lora_model_ID = "artificialguybr/PixelArtRedmond"

pipe.load_lora_weights(pretrained_model_name_or_path_or_dict=lora_model_ID,
                       adapter_name="pixel-art")
If needed, even multiple LoRA models can be merged in the same pipeline to allow multiple image styles. For the time being, I will use only one LoRA model.
Convert images to pixel art
Let me load the first input image. I am using PIL Python library to load the image. OpenCV library can also be used to load images in Python.
# load image
input_img = load_image("selfie.jpg")

# read image
input_img
As you can see it is a selfie-like image. You need to first upload this image to your running Colab notebook session from your local machine before you can load the image.
Now I will use LoRA-powered SDXL Turbo in an image-to-image pipeline.
prompt = "Pixel Art"

# generate image
image = pipe(
    prompt,
    width = 512,
    height = 424,
    num_inference_steps=15,
    image=input_img,
    guidance_scale=2.5,
    cross_attention_kwargs={"scale": 1.0}
).images[0]
As you can see, I am using “Pixel Art” as my prompt. It is required because you have to include the trigger word/tag of the LoRA model that you are using otherwise the LoRA model will not contribute to image generation.
Inside pipe, I am using multiple parameters in addition to the prompt and the input image (input_img) parameters. The descriptions of other parameters are as follows:
widthandheight– These parameters are used to specify the dimensions of the generated images. Try to keep the ratio of height and width identical to that of the input image. Also, do not use larger values for these parameters as it may exhaust the available GPU memory resulting in an “Out of Memory” error.num_inference_steps– In general, the greater number of inference steps or denoising steps better the image quality of the output. However, with models like SDXL Turbo, a good quality image can be generated in 5 to 15 steps compared to 30 to 50 steps in the case of the SDXL 1.0 model.guidance_scale– The guidance scale parameter specifies how strictly the model has to stick to the text prompt. A value between 5 and 10 is usually used in the case of text-to-image generation. For pixel art creation with the image-to-image pipeline, a value between 1 – 4 is enough.cross_attention_kwargs– This parameter indicates the percentage of LoRA model contribution to be used for image generation. Its value ranges from 0 to 1.0.
Now let me display the generated image and compare it with the input image.
# display image in a grid
make_image_grid([input_img, image], rows=1, cols=2)

Boom! Here is the pixel avatar of my selfie guy. Feel free to play around with the values of the parameters mentioned above, like num_inference_steps and guidance_scale, to bring changes in the output image.
Let’s try to convert another image into pixel art.
# load image
input_img = load_image("fruits.jpg")

# read image
input_img
This is a food photography image of some fresh strawberries. Interesting!
prompt = "Pixel Art"

image = pipe(
    prompt,
    width = 512,
    height = 424,
    num_inference_steps=15,
    image=input_img,
    guidance_scale=2.5,
    strength=0.5,
    cross_attention_kwargs={"scale": 1.0}
).images[0]
I have kept the image dimensions the same as this new input image has similar dimensions. This time I have also used a new parameter, i.e., strength.
Values of strength vary from 0 to 1. If the value is near 0, the generated image will be more similar to the input image. If the value is towards 1 then the generated image will be more different from the input image or the model will use its creativity more to generate the image.
This is why I prefer using Python for image generation rather than other tools because you can customize almost anything in Python and the workflow can be applied on a large number of inputs.
Let me display the image.
make_image_grid([input_img, image], rows=1, cols=2)

In this output image, the background is quite different from the input image that is because of the strength parameter.
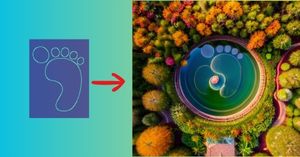
Let’s see how this pipeline works on a human body.
# load image
input_img = load_image("little-girl.jpg")

prompt = "Pixel Art"

image = pipe(
    prompt,
    width = 424,
    height = 640,
    num_inference_steps=20,
    image=input_img,
    guidance_scale=2.5,
    strength=0.4,
    cross_attention_kwargs={"scale": 1.0}
).images[0]

make_image_grid([input_img, image], rows=1, cols=2)
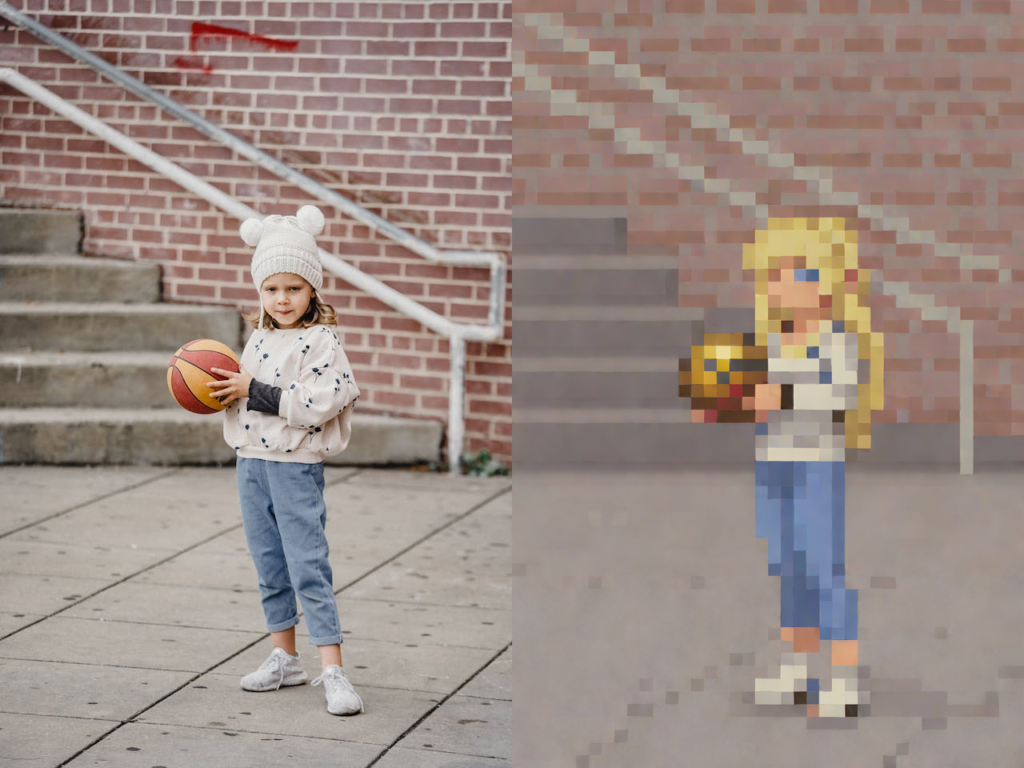
Not bad I guess. If you wish you can always add more information in the prompt if you want to further modify or add new elements to the generated image.
I hope you have now understood the process of converting your images into pixel art using Stable Diffusion. I suggest you read about ControlNet and try to figure out how it can be used with this image-to-image pipeline for pixel art creation.