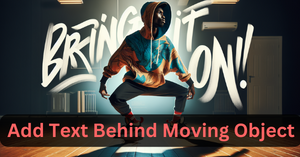
In this step-by-step tutorial, I am going to show you an amazing way to add text behind moving objects using Python. I will use a pre-trained YOLOv8 model and OpenCV to perform this task.
My objective is to insert a text string behind a moving person in a video. However, this method can be applied to objects other than humans as well if the YOLOv8 model recognizes those objects.
YOLOv8 is a state-of-the-art class of models that can perform object detection and instance segmentation. And guess what! you don’t need a GPU to use YOLOv8.
The final video will look like this.
Install Ultralytics library
Ultralytics library is used to import YOLO models. Run the following command.
!pip install ultralytics
Import YOLOv8 Model
Let’s import the required Python modules and the YOLOv8 model. I will use the YOLOv8 small model, but nano, medium, and large variants of the same model can be used.
from ultralytics import YOLO
import cv2
import numpy as np
import matplotlib.pyplot as plt

# Load a YOLO v8 small model
model = YOLO('yolov8s-seg.pt')
Define a function to add text to image
Let’s define a function to add a text string to the image. Here OpenCV is primarily used for specifying the font style, size, and other things.
def add_text(image,
             text,
             font = cv2.FONT_HERSHEY_SIMPLEX,
             font_scale = 4,
             font_thickness = 10,
             font_color = (50, 100, 237)):

  # Get the size of the text box
  text_size = cv2.getTextSize(text, font, font_scale, font_thickness)[0]

  # Calculate the position to center the text
  text_x = (image.shape[1] - text_size[0]) // 2
  text_y = (image.shape[0] + text_size[1]) // 2

  # Put the text on the image
  image_with_text = cv2.putText(image.copy(), text, (text_x, text_y), font, font_scale, font_color, font_thickness)

  return image_with_text
Load first frame of input video
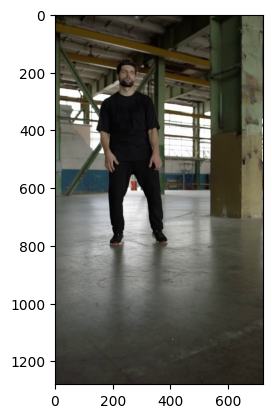
Let me show you how we can insert text in an image behind a person on a single frame first, then it will be replicated for all the frames of the video.
I will simply load the first frame of the input video (sample_video.mp4).
# load first frame of the video
cap = cv2.VideoCapture("sample_video.mp4")
_, frame = cap.read()
cap.release()
The frame is nothing but a three-dimensional numpy array. Let’s check out the shape of the frame.
# size of the image
frame.shape
Output: (1280, 720, 3)
The height of the video is 1280 pixels and the width is 720 pixels.
# display the first frame
plt.imshow(cv2.cvtColor(frame, cv2.COLOR_BGR2RGB));
Human body segmentation using YOLOv8
Now I will use YOLOv8 segmentation model to perform instance segmentation on this frame/image. In other words, I am going to create a magic mask for the person in the image.
# get YOLO predictions on the image
results = model(frame)
Let’s find the classes of the objects segmented by the model in the image.
# classes of objects detected in the frame
results[0].boxes.cls
Output: tensor([0.])
There is only one object in the given image: a human. The label for human is “0”. The list of all the recognizable objects by YOLOv8 are given below.
{0: 'person', 1: 'bicycle', 2: 'car', 3: 'motorcycle', 4: 'airplane', 5: 'bus', 6: 'train', 7: 'truck', 8: 'boat', 9: 'traffic light', 10: 'fire hydrant', 11: 'stop sign', 12: 'parking meter', 13: 'bench', 14: 'bird', 15: 'cat', 16: 'dog', 17: 'horse', 18: 'sheep', 19: 'cow', 20: 'elephant', 21: 'bear', 22: 'zebra', 23: 'giraffe', 24: 'backpack', 25: 'umbrella', 26: 'handbag', 27: 'tie', 28: 'suitcase', 29: 'frisbee', 30: 'skis', 31: 'snowboard', 32: 'sports ball', 33: 'kite', 34: 'baseball bat', 35: 'baseball glove', 36: 'skateboard', 37: 'surfboard', 38: 'tennis racket', 39: 'bottle', 40: 'wine glass', 41: 'cup', 42: 'fork', 43: 'knife', 44: 'spoon', 45: 'bowl', 46: 'banana', 47: 'apple', 48: 'sandwich', 49: 'orange', 50: 'broccoli', 51: 'carrot', 52: 'hot dog', 53: 'pizza', 54: 'donut', 55: 'cake', 56: 'chair', 57: 'couch', 58: 'potted plant', 59: 'bed', 60: 'dining table', 61: 'toilet', 62: 'tv', 63: 'laptop', 64: 'mouse', 65: 'remote', 66: 'keyboard', 67: 'cell phone', 68: 'microwave', 69: 'oven', 70: 'toaster', 71: 'sink', 72: 'refrigerator', 73: 'book', 74: 'clock', 75: 'vase', 76: 'scissors', 77: 'teddy bear', 78: 'hair drier', 79: 'toothbrush'}
Let’s try to extract the mask-array of the detected person from the predictions of YOLOv8.
# get index of person-object in the image
person_idx = np.argmax(results[0].boxes.cls == 0).item()

# get mask-array of the detected person
mask = results[0].masks.data[person_idx].numpy()

# display mask-array
plt.imshow(mask);
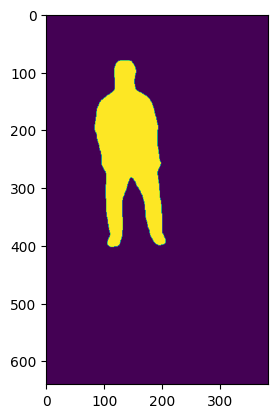
As you can see from the axes of this image above, the dimensions do not match the height and width (1280, 720) of the input video. This is one issue with the YOLO models that the size of the mask array does not match with the size of the input image.
Therefore, we will have to resize the mask image using OpenCV.
mask = cv2.resize(mask,
dsize=(frame.shape[1], frame.shape[0]),
interpolation=cv2.INTER_AREA)
# make mask binary
threshold = 0.3
mask = np.where(mask >= threshold, 1.0, 0)
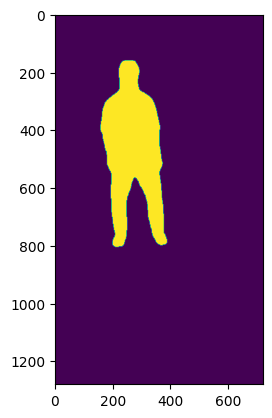
# display resized mask
plt.imshow(mask);
Add text behind moving person in an image
Now we will use the add_text() function to insert text in the same frame image.
# add text to image
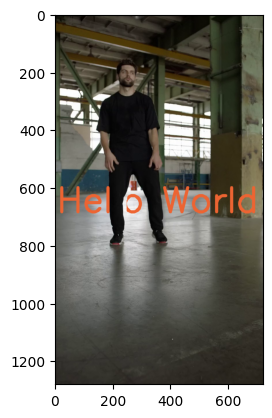
frame_with_text = add_text(frame, "Hello World")
plt.imshow(cv2.cvtColor(frame_with_text, cv2.COLOR_BGR2RGB));

As you can see, I have added “Hello World” in the frame. Right now the text is on top of the person in the video. We aim to make the text appear behind the person.
So, we will assign the pixel values of the frame without text as zero wherever it did not overlap with the mask identified by the YOLOv8 segmentation model.
For the frame that contains the text string, we will assign the pixel values as zero wherever it overlaps with the mask.
frame[mask == 0] = 0
frame_with_text[mask == 1] = 0
Let’s display both frames after this image manipulation.
# frame without text
plt.imshow(cv2.cvtColor(frame, cv2.COLOR_BGR2RGB));

# frame with text
plt.imshow(cv2.cvtColor(frame_with_text, cv2.COLOR_BGR2RGB));
Let’s add these two frames and see the magic.
final_frame = frame + frame_with_text
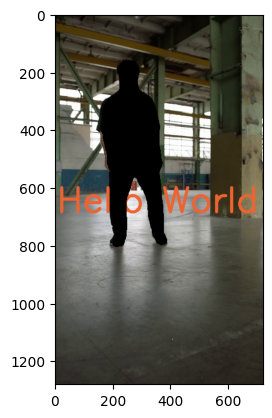
plt.imshow(cv2.cvtColor(final_frame, cv2.COLOR_BGR2RGB));
As you can see, the text is now behind the person. Now I will apply the same method on the remaining frames of the video and insert the text string “Hello World” behind the moving person.
Insert text behind moving person in video
Alright, I will now define a function and try to implement the same techniques on all the frames of the input video. Before that let’s create a video writing object that will stitch all the frames into a new video.
# Read the input video
cap = cv2.VideoCapture('input_video_3.mp4')

# Get the video properties
width = int(cap.get(cv2.CAP_PROP_FRAME_WIDTH))
height = int(cap.get(cv2.CAP_PROP_FRAME_HEIGHT))
fps = cap.get(cv2.CAP_PROP_FPS)
cap.release()

# Create a VideoWriter object for the output video
fourcc = cv2.VideoWriter_fourcc(*'MP4V')
out = cv2.VideoWriter('output.mp4', fourcc, fps, (width, height))
The output video will be saved in the current working directory as ‘output.mp4’.
def create_video(video_path):
  # Open the video file
  cap = cv2.VideoCapture(video_path)

  # frame counter
  cnt = 0

  while True:
    # Read a frame from the video
    ret, frame = cap.read()

    # Break the loop if the video has ended
    if not ret:
        break

    # get YOLO predictions
    results = model(frame)

    if (results[0].boxes.cls == 0).sum().item() != 0:
      # find index of person-object
      person_idx = np.argmax(results[0].boxes.cls == 0).item()

      # get binary mask of the image
      try:
        mask = results[0].masks.data[person_idx].numpy()
        mask = cv2.resize(mask,
                          dsize=(frame.shape[1], frame.shape[0]),
                          interpolation=cv2.INTER_AREA)

        mask_2 = np.where(mask >= 0.3, 1.0, 0)

        frame_with_text = add_text(frame, "Hello World")

        frame[mask_2 == 0] = 0
        frame_with_text[mask_2 == 1] = 0

        final_frame = frame + frame_with_text

        out.write(final_frame)
      except IndexError:
        out.write(frame)

    else:

      out.write(frame)

    cnt = cnt+1
    print("frame no. "+ str(cnt))

  # Release video writer object and capture object
  out.release()
  cap.release()
Let’s use the create_video() function to add text behind a moving human in a video.
create_video("/content/input_video.mp4")
Conclusion
In this article, we learned how to add text behind a moving person in a video using Python and computer vision. We used the YOLOv8 segmentation model to segment the polygon of a person in the video and insert the text string behind the polygon.
I have a video tutorial as well if you want more clarity.
This method will work for only those videos where there is only one person in the foreground. Try to use the same technique for objects other than humans and put the text behind those moving objects.
You can also check out my tutorial on creating video-inside-text effect if interested.
Feel free to download the entire code notebook and the input video from here.